top of page
Textiles AS 2015-2016
 Page 1Project - Learning Texture This was the first project of the year, with heavy focus on creating your own textures in muted colours, and experimenting with layering these textures, colours and materials to create a detailed piece. |
|---|
 Page 2Project - Learning Texture Some of the materials shown in my experiments above include fabric wadding, ironed to fuse together, trapping small scrap pieces of textured paper, and secured with thread. I enjoy the contrast between hard and soft materials, and the different levels of detailing. |
 Page 3Project - Learning Texture These small parcels were the product of wrapped paper, that had been treated with wax, pen, brown and blue dye and pencils, and finished with layers of thread. |
 Page 4Project - Learning Texture In this piece I enjoyed using dissolvable plastic, which left behind this intricate sewing pattern above. Another plastic used for sewing is acetate, also demonstrated on this page. |
 Page 5Project - Learning Texture Cutting holes into my sketchbook allows viewers to see either side of experiments such as these. |
 Page 6Project - Learning Texture Combining delicate and detailed stitching with harder materials like plastic and paper create an intricate piece. I liked how outlining a piece of textured paper with stitches really brings definition. |
 Page 7Project - Learning Texture Expanding out to try new materials, I started trapping small scrap pieces in cellotape and PVA glue. |
 Page 8Project - Learning Texture Another acetate trapping with scrap paper and machine sewing. |
 Page 9Project - Learning Texture Following on from my PVA glue experiments, I created another on a larger scale. I particularly love the new colours that have been created due to the ink on the papers running and mixing with the wet glue. |
 Page 10Project - Learning Texture Now incorporating red into the textures through the use of thread. I enjoy the experiments with geometric patterns on this page. |
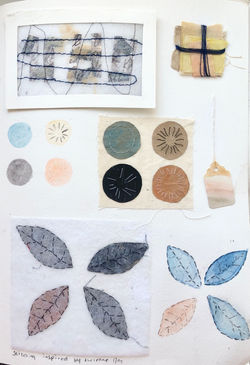
 Page 11Project - Creating Texture Inspired by the artist Christine Mauersberger, I created a page inspired by her detailed hand-stitching and use of monotone colour palette. |
 Page 12Project - Creating Texture Using the techniques learnt in the previous project, I have taken inspiration from the artist Lucienne Day. |
 Page 13Project - Creating Texture Inspired by Day's famous piece 'Apollo', I created this piece from scrap textured paper and wadding, using her iconic orange and brown colour palette. |
 Page 14Project - Creating Texture Patterns and stitching inspired by Lucienne Day's artwork 'Isosceles'. |
 Page 15Project - Creating Texture More pieces inspired by Lucienne Day's work, while using techniques learnt in the previous project. |
 Page 16Project - Creating Texture More pieces inspired by Lucienne Day's work, while using techniques learnt in the previous project. |
 Page 17Project - Creating Texture Using the same blue from Lucienne Day's patterns, I set out to create my own textured pattern. |
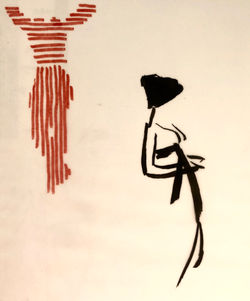
 Page 18Project - Creating Texture I adopted a new colour palette of black and red, which was inspired by the fashion designer Vivienne Westwood, but still incorporated Day's detailed hand stitching. I like the way the strong colours contradict the small and delicate hand stitching. |
 Page 19Project - Creating Texture Vivienne Westwood uses a lot of reds, greens and blacks in her fashion, and has a strong connection with tartan. I combined these colours in a weave to emulate her tartan patterns. |
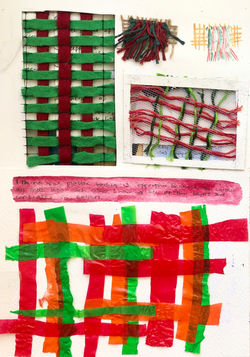 Page 20Project - Creating Texture Continuation of Vivienne Westwood inspired weaves. |
 Page 21Project - Creating Texture A more intricate weave made with various materials, using a warm colour palette. |
 Page 22Project - Creating Texture Using coloured and written on paper, I made a more detailed weave, inspired by Vivienne Westwood's patterns. |
 Page 23Project - Creating Texture Using a similar Westwood colour palette, I took strips of paper covered in wax, pen and ink, and secured them together with stiches. |
 Page 24Project - Creating Texture Another similar piece using paper strips and stitches. |
 Page 25Project - Creating Texture Another similar piece using paper strips and stitches. |
 Page 26Project - Creating Texture Another similar piece using paper strips and stitches. |
 Page 27Project - Creating Texture To shift focus from the paper strips to the stitches, I used a darker thread and stitched in regular patterns. |
 Page 28Project - Creating Texture Using a similar stitching technique but with a cooler colour palette. |
 Page 29Project - Creating Texture Continuation of Westwood inspired weave patterns. |
 Page 30Project - Creating Texture Using the techniques from the previous pages, I wanted to change the colour scheme to variations of the contrasting colours blue and yellow to see if it would look any different. I particularly like the weave stitching on the burlap, and the plastic weave fused together with heat. |
 Page 31Project - Creating Texture On this page, I used contrasting and complimenting colours, and layered them using different techniques. |
 Page 32Project - Creating Texture Another experiment with fusing plastic together using heat, this time in green and black |
 Page 33Project - Creating Texture The multicoloured layering technique from page 20 worked well, and reminded me of bunting. This pink strip is multiple layers of different materials and different variations of pink, cut at different lengths to look like bunting. |
 Page 34Project - Creating Texture Using the same technique on page 22, here I have overlaid scrap card and netting and sewn them together to create a similar, yet harder and more solid bunting. |
 Page 35Project - Creating Texture Here I have used more uniform shapes to layer into bunting. The shapes are folded circles, made from wadding. |
 Page 36Project - Creating Texture Using the same shapes as the previous page, this time I have added colour and texture by printing onto the wadding. I also added another variation of 'bunting' that just required the material to be folded together and cut into. |
 Page 37Project - Creating Texture Using the same technique of folding the material with a piece of printed cotton. I also sewed into the wadding to create the same pattern I have been making on the paper and cotton. I love the affect of the overlaid sewing and the contrast between colours. |
 Page 38Project - Creating Texture Returning back to the simpler bunting variations, this time in a blue colour palette, and a smaller and neater multi-coloured one. |
 Page 39FMP - Map Dress For my final project, I transitioned into fashion and clothing construction. This page introduces fashion patterns to my project. To suggest texture, I printed a pattern of a bodice onto fabric and stitched into it to define the shapes. |
 Page 40FMP - Map Dress Here I have combined the bunting technique from the previous project with a defined pattern panel. |
 Page 41FMP - Map Dress Julia Griffiths Jones is a textile artist that creates 2D dresses from wire. I experimented with combining wire with sewing with these hearts. |
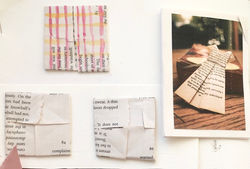 Page 42FMP - Map Dress The use of wire to create a 2D dress made me interested in the manipulation of different material and the shapes one can make. I looked at the art of origami and created these folded squares with book pages. |
 Page 43FMP - Map Dress Continuing with the theme of origami, I created more complex shapes such as these stars. |
 Page 44FMP - Map Dress I practised creating these stars with different materials, but found that fabric needed to be secured by glue or stitching to stay in the star shape. |
 Page 45FMP - Map Dress Waxed fabric however does maintain the folds and stays in position. I sewed the edges together t make it look neater. |
 Page 46FMP - Map Dress Textured paper was better suited to create these stars. I loved to make varying sizes and slotting them together to make a bigger piece. |
 Page 47FMP - Map Dress I researched the artist Jennifer Collier, who works with recycled papers and creates them into 3D objects. I liked the idea of using harder materials such as maps as a dress pattern, and created this felting using a map printed onto fabric. |
 Page 48FMP - Map Dress I liked Jennifer Collier's use of maps, and found the artist Anne Biss who sews into maps to define certain parts. I printed a map pattern onto cotton and used the sewing machine to trace the roads. |
 Page 49FMP - Map Dress Continuation of sewing into maps. Rather than printing the map pattern onto fabric, I wanted to try sewing into a paper map that has been trapped in wadding. The idea was to then tear away the paper from inside the wadding to leave the thread, but this did not work to plan. |
 Map Dress in ProgressFMP - Map Dress Final Map Dress in progress. |
 Finished Map DressFMP - Map Dress Final Map Dress completed. |
Art Level 3 Diploma 2016
 Page 1Project - Drawing the Line This project emphasised the importance of simple line drawings of still life in a monochrome palette. This charcoal drawing depicts a corner of a bedroom. |
|---|
 Page 2Project - Drawing the Line Another charcoal drawing of a piece of furniture in a room. |
 Page 3Project - Drawing the Line Another charcoal drawing of a piece of furniture in a room. |
 Page 4Project - Drawing the Line A pencil and ink drawing of curtains. |
 Page 5Project - Drawing the Line A charcoal drawing of a door at the end of a hallway. |
 Page 6Project - Drawing the Line A watercolour painting of trees during the winter. |
 Page 7Project - Drawing the Line This piece is the beginning of the series of my matchbox study. This drawing produced from ink, glue and wax shows two matchboxes stacked. |
 Page 8Project - Drawing the Line Another quick sketch of matchboxes using wax and ink. I like the effect of overlaying ink on wax since the wax repels the ink and shows the line drawing. |
 Page 9Project - Drawing the Line A sketch of two matchboxes using glue and ink mixed together. I found that when the mixture dries on the page, there are new colours and textures that appear on the page. To apply the mix, I used a piece of cardboard to achieve the dragged affect. |
 Page 10Project - Drawing the Line I experimented with different black lines. The first one is droplets of ink running down the page. The top right shows the affect of ink over wax clearly, and the bottom right sketch is the result of using ink from a pen. |
 Page 11Project - Drawing the Line More experimentation with different black lines. |
 Page 12Project - Drawing the Line I experimented with creating negative space, firstly by burning the centre of a piece of paper to see what colours and shapes are created. The second is wax overlaid with ink. |
 Page 13Project - Drawing the Line Inspired by the artist Elston, I emulated his technique of dragging black and white paint. I used black and white acrylic and dragged the paint with the sides of a match box. |
 Page 14Project - Drawing the Line More experiments with dragging black and white paint with the side of a matchbox. |
 Page 15Project - Drawing the Line Using the technique from the previous pages, I mapped out the shape of a match box, but keeping the paint separate and adding newspaper to create more texture. |
 Page 16Project - Drawing the Line Using a matchbox as reference to draw a simple matchbox shape, whilst using the sides of a matchbox to drag ink and glue together. I found that ink and glue, once dried, left more variety of colour and texture than using acrylic paint. |
 Page 17Project - Drawing the Line A depiction of two matchboxes stacked. I used wax and ink for the bottom matchbox and dragged glue and ink across the page to map out the top matchbox, and filled it in with chalk. |
 Page 18Project - Drawing the Line Another depiction of a matchbox mapped out with masking tape, and removed to reveal the white page behind the layer of glue and ink. |
 Page 19Project - Drawing the Line Stacked matchboxes, on canvas using charcoal, chalk, glue and ink. |
 Page 20Project - Art in Motion Thick application of coloured acrylic paint capturing the blurred countryside outside a moving car window. |
 Page 21Project - Art in Motion Experimenting with how to show motion in art. These two paintings on acrylic overlaid give the impression that the person is moving. |
 Page 22Project - Art in Motion Screenshots from a video of a person walking. This is the foundations for my final piece for this project. |
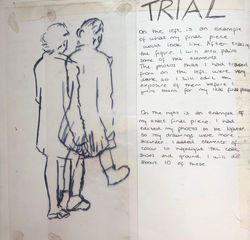 Page 23Project - Art in Motion For my final piece, I drew the outline of each frame and added minimal colour to keep the focus on the idea movement within still images. This was one trial done in my sketchbook before the final piece. |
 Page 24Project - Art in Motion Another trial of how I intended to make my final piece. This page shows how I wanted to add colour. |
 Page 25Project - Art in Motion Development and testing for my final piece. Eleven frames will be painted in acrylic paint on clear pieces of acrylic. |
 Page 26Project - Art in Motion Two painted frames from my final piece. |
 Page 27Project - 3D Structures This project required us to work in 3D. Inspired by interactive artists such as Do-Ho-Suh and Alvaro Diaz, myself and my team designed a wooden box structure with a light source in side, that would be enclosed with something that reacts well to light. |
 Page 28Project - 3D Structures Artist inspiration page. |
 Page 29Project - 3D Structures Our original idea was to use sheets stained with bright colours, so the light from inside would shine through, projecting colours around the room. However this did not work as well as we had hoped. |
 Page 30Project - 3D Structures Rather than projecting colour, we thought about how we could manipulate shadows that would cast themselves around the exhibition space. |
 Page 31Project - 3D Structures We used white wool, and wrapped it around the entire structure randomly. The wool was easy to install and dismantle, and was an effective medium to create texture and pattern. |
 Page 32Project - 3D Structures A close up image of the final cube. |
 Page 33Project - 3D Structures A sketch for the design of the main display structure for the November 2016 exhibition. |
 Page 34Project - 3D Structures A floor plan design of the November 2016 exhibition. |
Art Level 3 Diploma 2017
 Page 1Project - Fashion FMP I began this project by drawing and painting the male and female physique, to get a better understanding of how fashions form can accentuate the body. |
|---|
 Page 2Project - Fashion FMP Continuation of paintings. |
 Page 3Project - Fashion FMP I turned my attention to magazines and notable fashion designers, and admired their styles of fashion illustration. |
 Page 4Project - Fashion FMP Fashion illustration sketches inspired by magazine pages. |
 Page 5Project - Fashion FMP An abstract illustration of a female face, influenced from a magazine. |
 Page 6Project - Fashion FMP Paintings of fashion pieces by Alexander McQueen. |
 Page 7Project - Fashion FMP An artist reference page showing work from the fashion designer Beirendonck. |
 Page 8Project - Fashion FMP More images from Beirendonck's Sping 2012 collection. |
 Page 9Project - Fashion FMP Artist reference page for Jean Paul Gaultier. |
 Page 10Project - Fashion FMP More fashion illustrations, made with felt tip pens to create interesting forms with simple lines. |
 Page 11Project - Fashion FMP Inspired by Beirendonck's pom-pom fashion from Spring 2012, I started exploring how I could use pom-poms to create a fashion item. |
 Page 12Project - Fashion FMP Illustration of my pom-pom shall. |
 Page 13Project - Fashion FMP More illustrations of my pom-pom shall, with colourful pom-poms for reference. |
 Page 14Project - Fashion FMP A page explaining my process for making each pom-pom. |
 String and Glue BalloonProject - Fashion FMP Inspired by the shape of a pom-pom I used a balloon as a mould to create a bowel shaped sculpture. |
 String and Glue BalloonProject - Fashion FMP A close up of the inside of the bowel made from individual pieces of string glued together around a balloon. |
 White Thread and Glue BalloonProject - Fashion FMP To create a more delicate and intricate pattern, I used the same technique but instead of using thick and corse string, I used white thread. |
 White Thread and Glue BalloonProject - Fashion FMP A close up of the patterns created with glue and white thread. |
 Black Thread and GlueProject - Fashion FMP To make the pattern more bold, I made another bowel with black thread. Using a darker thread makes the small holes stand out more against a white background. |
 Three Textured BowelsProject - Fashion FMP All three textured bowels together for comparison. |
 Final Pom-Pom GarmentProject - Fashion FMP Garment made from hand made pom-poms and two larger bowel shapes on the shoulders made from glue and feathers around a balloon. |
 Final Pom-Pom GarmentProject - Fashion FMP Garment on mannequin. |
 Final Pom-Pom GarmentProject - Fashion FMP Close up of the feather shoulders. |
 Triangle DressProject - Fashion FMP (Sketchbook development unavailable) Dress made from clear PVC and laser cut acrylic, formed into 3D triangles. |
 Triangle DressProject - Fashion FMP (Sketchbook development unavailable) This dress was the result of a 3 month project. The final colour palette was inspired by the artist Mondrian, and the material was inspired by Iris van Herpen. |
 Triangle DressProject - Fashion FMP (Sketchbook development unavailable) Photo of the dress on a mannequin . |
 Triangle DressProject - Fashion FMP (Sketchbook development unavailable) Close up of the construction detailing. |
bottom of page